|
This is a removable lens you can make which will convert your normal (but excellent and wide) DVX100 lens into a very wide angle lens for about $100 or less cost, with about an hour's worth of work. The lens is based on the RAYNOX clip-on .3X semi-fisheye for 52-67mm threads, and you will have to buy and then modify this lens to work with the DX100 72mm threads. This lens will produce NO VIGNETTING seen on a standard TV or monitor, or in widescreen letterbox mode. This is a fairly easy project, and in fact easier than my GL2 52mm w/a lens project previously posted on this web site. Compare this with paying about $250+ for the aftermarket .5X w/a lens adapters for this camera, or $800 for a .3X lens adapter with virtually the same (and perhaps according to the Century Optics description, worse than my design) performance. It gives you a wider angle than .5X w/a adapters
now available for this camera and is cheaper than the commercial adapters
currently out there. It is NOT a multi-element lens, and this will restrict
your zoom use only slightly from about the 4.5 -17 marks on the DVX lens. I.e., 2/3 of the DVX zoom remains intact without refocussing necessary.
Century Optics tells us their lens will NOT zoom, and that vignetting occurs.
This gives you additional and welcome wider angle which starts right about
where the DVX widest setting ends.This is extremely welcome in cramped
indoor situations or to use as a very effective wide angle effect. The camera's stock lens shade must be removed from
the camera for use, but you can make a wide angle lens shade out of some
cardboard that will add some extra shading if you need it. Please note
that with any super wide angle lens, lens shading is a difficult dilemma
to begin with anyway, as any serious lens shade will be picked up on the
perimeters of your camera view.
The performance of the lens is very good- keep in mind the lens on which this is based is a $100 single element lens. In most situations, you are using this lens for effects, and your subject is probably not a resolution line chart- so personally, I've been very happy with it.
Your materials:
YOU WILL NEED: 1) Raynox XL-3000PRO 52mm-67mm 0.3x Ultra Wide B&H carries this, but I recall getting mine for about $79 (amnesia?) , maybe you can save a little money if you shop around. B&H is dependable and fast however. Typically about $99 http://www.bhphotovideo.com/bnh/controller/home?A=ShowProduct&kw=RAXL3000PRO&Q=&O=&sku=216181 2)
JB Weld epoxy. (This
is the BEST epoxy for this kind of project, dependable and strong, it's
preferred over other clear epoxy and 5 minute versions.)
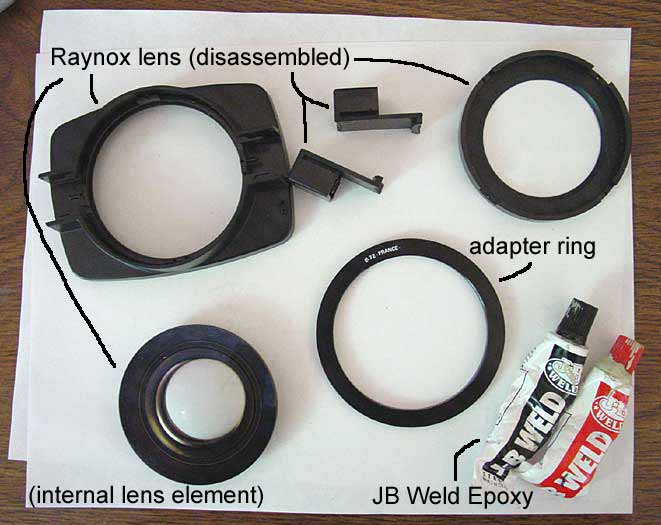
Okay, here we go! STEP ONE: Take your Raynox lens apart. First violently break off the push together side clips. You can get out pent up aggression here. You will expose some little screws which you then remove, and the lens will come apart into the big wide front and the smaller back portion, and the separate internal lens element. BE CAREFUL NOT TO DAMAGE OR THROW AWAY THE FRONT BIG PLASTIC CASING HALF. You will use this. You can throw away the smaller push clips, the round back smaller portion, and the screws however. Or throw them at your little sister who is annoying you while you try to do this important scientific work. The lens element will come
out - it's not glued in- and be careful with that. Don't drop it on a concrete
floor or you will get very upset.
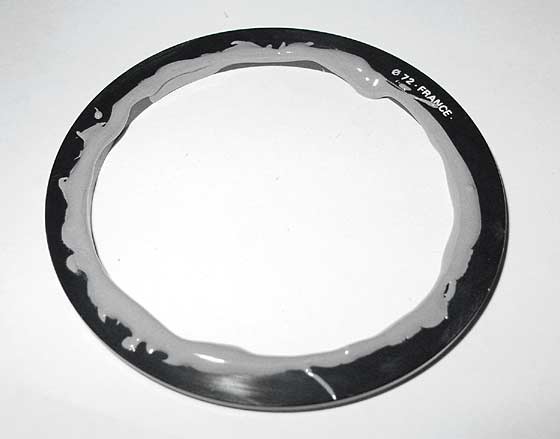
STEP TWO: Find a flat level place where you can glue your lens to the adaptor ring. Mix the JB Weld in equal parts (just like the directions say), and mix about a teaspoon's or tablespoon's worth. Put some JB Weld on the inside upper edge of the ring, be reasonably generous, not too much, but not too little. You are putting glue on the FLAT SIDE opposite the 72mm threads. Don't get glue on the 72mm threads, if so clean it off with solvent.
Place the lens element inside the ring:
Obviously to most of us, the wider part of the lens is UP towards the sky. Otherwise it will simply fall through the adapter, ahem. Look at the lens from straight above and get it perfectly centered.
CAREFULLY smooth out the glue with your finger, being gentle so you don't move the ring off center. Do not pick your nose at this point. Wait until you've cleaned off your finger.
Okay, DON'T TOUCH THIS FOR
24 HOURS. Be patient. Go walk your dog across town. JB Weld
takes overnight to dry properly, but once it does, it is like steel- unlike
the 5 minute stuff and the clear epoxies. Don't use the quick JB Weld as
it is inferior to the regular formula.
If you do get any glue on either the front or back surface of the lens, remove it with solvent now, before it dries.
Denatured alcohol will work fine, and none of these should remove any lens coatings.
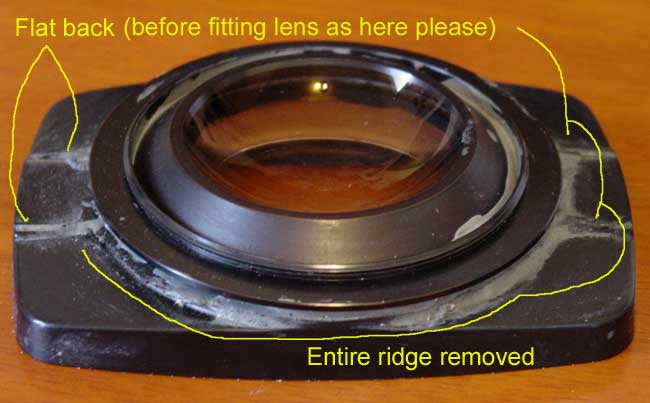
STEP THREE (more or less): This part is actually optional, but highly recommended. Once the glue dries you can actually use the lens. However, it will afford no edge protection and make the lens harder to handle, and allow no lens shading options. While you are waiting for the glue to dry, grind or cut down the 1/2" extended ridges on the back of the front part of the Raynox plastic assembly. A grinding wheel on a portable drill or , or even better yet - a bench grinder if you can get to one (these are $39 at Ace Hardware or Home Depot) makes this a quick and easy task. Using a knife, an exacto blade or regular file makes this a rather tedious job. Be careful to only remove this extended lip that normally holds the lens element in place. Do not widen the lens opening whole or grind through other portions of the case. Take your time and be accurate. Ruin the plastic here and you won't have edge protection for your lens.
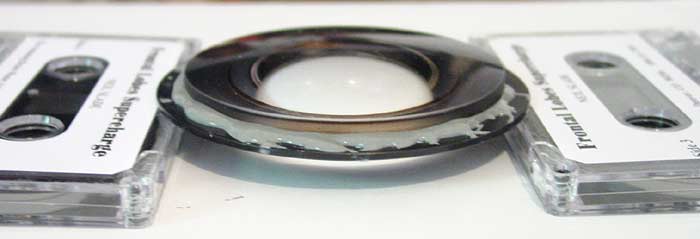
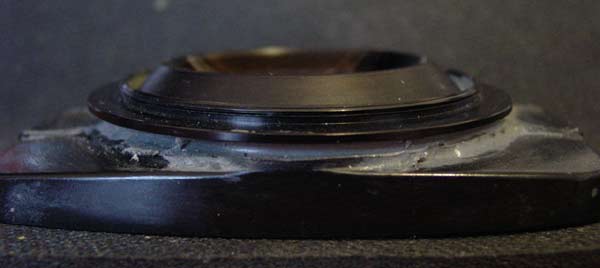
In the photo below of the finished lens project (we're not there yet and you're not actually glueing yet as in this picture) you can see where I've grinded down the ridges and circular ridge on back. This will have to be done so that the lens/adapter glued assembly will lie flat on the back of the plastic casing REAR SIDE. Note, the lens is now big end down here, and you can see the threads that screw onto the DVX here on the back side of your lens/adapter assembly, here fitted into the plastic case. Don't yet glue to the plastic case, okay?
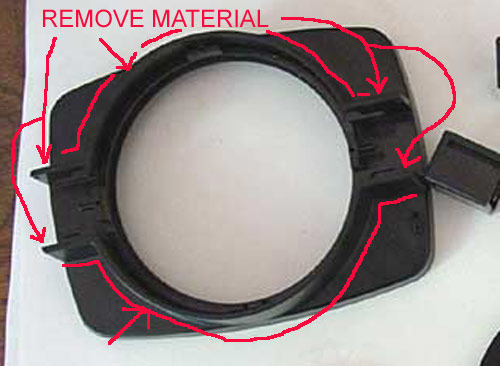
STEP FOUR AFTER THE GLUE IS DRIED 24 HOURS LATER: Without glue, place the lens/adaptor ring assembly on the flattened back of the plastic case. See that it will lie perfectly flat first. DO NOT GLUE YET!! It will snuggly be held in place, but will easily pop out for now. That's okay. Screw the lens carefully on the front of your DVX. You will be able to rotate the rectangular case 360, and it may pop off. But just slip it back on if it does. Turn on your camera go to the widest angle zoom. WOW! Super semi-fisheye view. HOWEVER-- you will notice some very slight vignetting in the corners. Believe it or not, this is caused by the 3/32" of edge in front of the lens, the thickness of the plastic casing. By simply removing a small portion of this in the four corners of the casing that lies flush against the front part of the lens, you can get rid of all of the corner vignetting. Note-- you have to do this
before you glue the lens assembly in place on the plastic case. So, what
you will do is file down the corners as shown with a small rounded file,
try the lens back on the camera, and file again until all the vignetting
disappears. It may take two or three tries or more. Go slow, and don't
try to do this all in one attempt.
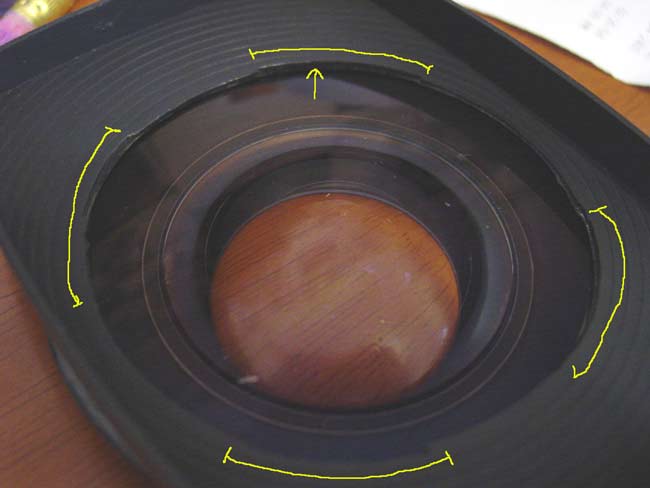
IMPORTANT! Do not simply go all the way around the circumference of the lens opening to eliminate vignetting. If you do this,
the lens will fall out through the front! You need to leave the original plastic at the noon, 3, 6, and 9 areas to keep the lens in place.
Only remove a little bit of platic as shown in the photo at the yellow line defined areas. It's a little hard to see this
in the photo, but look and you'll see what I'm talking about.
Last STEP FIVE: OKAY PAY ATTENTION. When you glue the lens assembly to the "cornered out" plastic case, you will have to make sure the plastic case is rotated to the right position on the lens when the lens is screwed onto the camera. Are you paying attention here? What I am telling you is that you can't arbitrarily glue the lens onto the case- BECAUSE, the "cornered out" vignetting fix will only work if when the lens is screwed onto the camera fully, so the corners line up with the corners of your video picture. I.E. If after you've glued the thing together arbitrarily, and you screw the lens onto the camera tight-- and you end up with the lens shade case at an angle, not only will it look totally goofy, but the portions of the case you scooped out to remove the little bit of corner vignetting will more importantly not line up properly. Mix some more JB Weld, and apply it to the lens assembly on the FRONT/top of the adapter portion where it will contact the plastic lens shade case. Just slip it all together so you can clearly see where glue need to go. THEN glue it. Don't get glue on the inside of the plastic lens shade casing, or it will squeeze through and end up on the front of the lens. HOWEVER, if this does happen, just use a little solvent and a Kleenex and clean it off. No worry. When its all done, you can paint the glue black if anybody cares, but I've left it gray here so you can see how it's glued in.
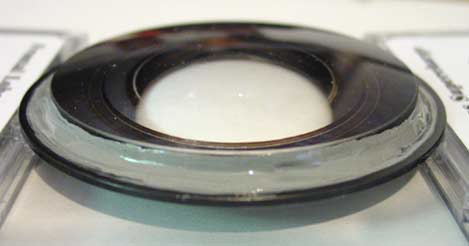
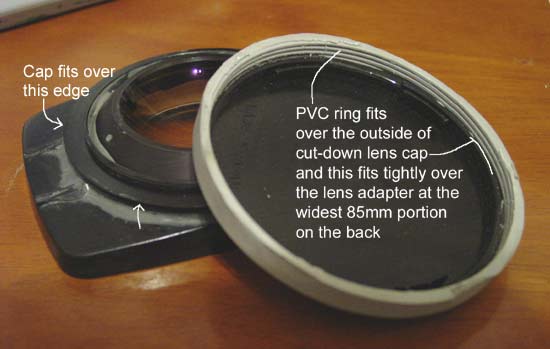
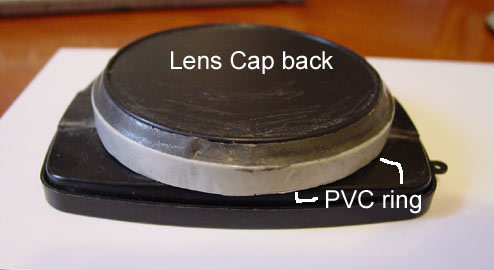
SO-- immediately after you glue the lens assembly to the case, screw the lens assembly snuggly into place on the camera. Rotate or place the lens shade case you've carefully adjusted so it is PERFECTLY perpendicular and in the proper angle. See my very top photo. Got it? Maybe you can put a little tape on the front of the lens so it says in this position. You can carefully unscrew the lens from the camera, being sure NOT TO FURTHER ROTATE THE CASE on the lens assembly out of whack again. It should be snug enough so you can remove it with the lens without anything turning. Lie flat and let dry. LET IT DRY 24 hours again before you touch it again. VOILA YOU'RE DONE!You can use the original rectangular lens cap for the front of the lens, and construct a cap for the back- otherwise you will need to find a deep 85mm lens cap to protect the back of the lens. I couldn't find one, so I made one by combining the biggest lens cap I could find with a thin slice of PVC pipe- left gray here. I slipped the PVC "ring" over the outside of the cut down lens cap, glued them together, and this fits snug over the widest part of the lens adapter ring than holds the lens in place. It's not really pretty here, but you can paint all of this glue and gray stuff black if you are afraid your girlfriend will make fun of you. I know this isn't particularly clear in WORDS, so, see the photos below....
It is possible to make a small 1/2" lens shade that you can additionally tape onto the outside edges of the plastic housing. But be aware, this lens is SO wide angle, that this will be a very narrow triangular shape, and won't be of a lot of good. Frankly, I made this, but gave up on using it and restricted my super w/a adapter to indoors, or not pointed at the sun. Below are comparative still photos captured from the DVX using this lens. Note: This is the image you will see in the camera's LCD, or on a standard monitor or TV. (When you capture, the image borders are slightly expanded from these usable "safe" areas, so this is practical area you will see on a screen. In your movie editing capture software preview, you will get some corner vignetting but only in the len's highest wide angle setting in 4:3 aspect ration (however NOT in widescreen). This will not be seen as the edges are indented when shown on a monitor or TV. Since this is an extremely wide lens converter, you will begin to see barrel distortion at the minimum setting, moving towards distinct barrel distortion at the widest semi-fisheye extreme. This is standard for any spherical super-wide angle lens. To avoid obvious distortion of straight lines, simply avoid them in your composition if you find them objectionable, but know that this is part of using wide angle lenses. Also note, the DVX is not meant as a still image camera, so the resolution of still captures is going to be a about 700 X 480 pixels, none of these photos are razor sharp like a decent still camera. HOWEVER, do not be deceived, the DVX camera produces the sharpest moving images of any under $30,000 video camera, totally obvious in an A/B comparison with any camera anywhere near this price range. When show on a good TV, the video with the w/a adapter looks fantastic, as does all DVX footage.
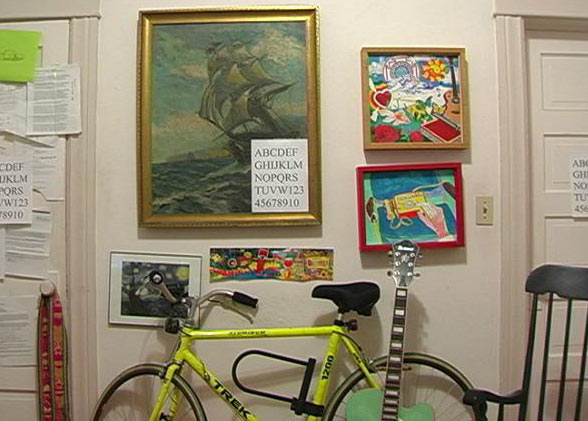
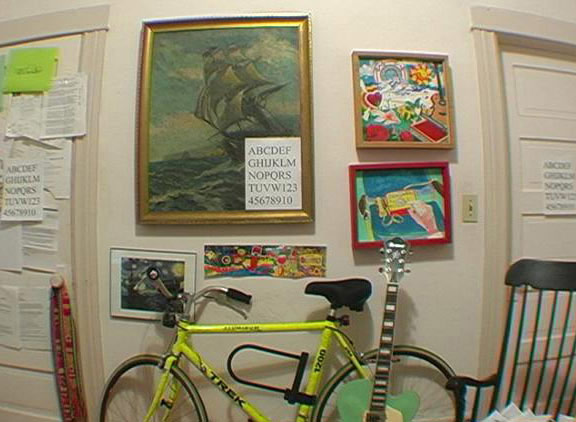
MOVE EACH PHOTO TO THE SAME PART OF YOUR MONITOR before comparing. Often, images in one part of a monitor will look different than in another part- yep. Especially on LCDs. Don't try to look at more than one picture at the same time, center each photo, look for details, then move the next picture to the same location on your monitor, THEN compare. Normal lens at the widest setting, even with the amazing Leica lens, a bit of barrel distortion begins at this widest setting. Reasonably uniform sharpness throughout:
With wide angle converter attached at the lowest setting. The sharpness is not as uniform throughout clear to the edges, but in the majority of the center frame, the sharpness is very close to the normal lens without the adapter. The actual difference and softening can be seen if you look at the ship's rigging at the front of the ship above the horizontal beam. Look at the diagonal edge of the number "4" in the middle chart. It's not a big difference at all. Some color showing up between the chair spokes where the contrast is quite pronounced, but nothing really serious. It's apparent in the normal lens to a degree as well. Not bad at all, in fact, pretty damn good for the Raynox.
At the widest setting, the chromaticism almost disappears in the chair spokes, though a bit in the lower right. Sharpness is more uniform here in the widest setting. Very, very nice. Quite amazing for a $100 lens:
At the very finest magnifying glass comparison, yes there is a difference between a picture taken with the amazing normal Leica lens on this camera, and the picture after you put another $100 or even $800 1/2 inch thick heavy convex lens in front of it, no matter what brand. However, once you get into wide angle shots of this magnitude, on a moving video image, this degree of difference or quality change should not be noticeable by anyone not using a microscope. almost certainly it won't be noticed on a TV by viewers watching your film. The performance of this lens is remarkable considering the cost. CONTINUED BELOW THE GREEN LIST Here....
MY
FEATURE MOVIE SHOT WITH DVX100 edited in Vegas 6.0
MORE COOL FREE VIDEO STUFF:
TRUE
Widescreen Letterbox video on a Standard TV. Yes.
DVX100
.3X DIY Semi-Fisheye Lens Project
$40 GL2 .5X GL2
Super Wide Angle DIY Lens Project
Better
and Cheaper Mike Boom Pole
EXTENDED
Super Camera Jib/Crane Modification
Better
Almost Free Flip-Out LCD Lens SHADE for Camcorders and DVX100
Desktop PC DVD Burning 42X speed 3 Simultaneous Reliable Burns on 8X Media Back to The Amazing Brain Music Adventure
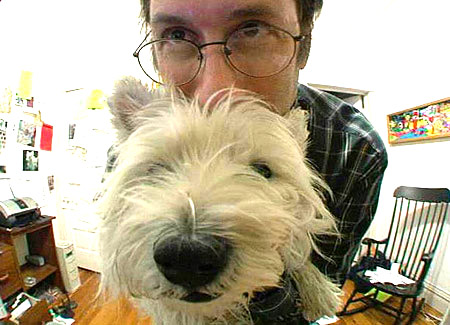
OKAY, a few more stills using the lens-- I took these quickly, didn't pay much attention to exposure or light, whether I shaved or brushed my teeth even, just wanted to show the lens at its extreme hilarious capabilities First me, about 14 inches from the camera:
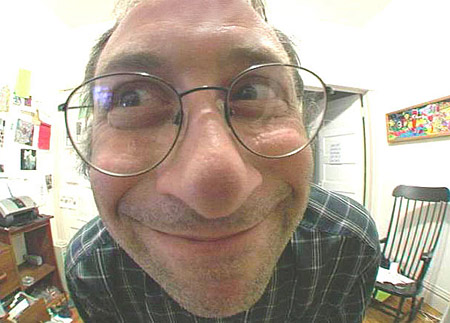
Here I am with my nose about an 1.5 inches from the lens, this is my Pete Townsend Memorial Photo:
And finally Chloe Da Whoaee and me:
|
PRINTED AND
NEW BRAIN BOOK! TICKLE YOUR AMYGDALA
The Whole Universe Brain DVD Special 40 Hours! JUST $49
5 Books 20 Audio Albums + BONUSESRead About It Here ANYWHERE IN THE WORLD
ALL INSTANT
Much more at The Amazing Brain Book and Music Store
|


|
The AMAZING BRAIN ADVENTURE's MOST POPULAR PAGES:
Your Amazing Brain Adventure is a web site all about Tickling Your Amygdala- i.e. turning on the best part of your brain as easy as clicking on a light switch. This is done as easily as imagining a feather inside of your head stimulating a compass, the amygdala. The amygdala is a set of twin organs, a part of your brain that sits right in between the most advance part of your brain- the frontal lobes and pre-frontal cortex- and the most primitive part of your brain- your "reptile brain" and brain stem. By tickling your amygdala you instantly and directly increase creativity, intelligence, pleasure, and also make possible a spontaneous natural processes known as "paranormal abilities", although such things as telepathy and ESP are really as natural as breathing, or as easy doing simple math in your head. The ability to self stimulate the amygdala by something as simple as thought has been proven in laboratory experiments, such as those conducted at Harvard University research labs, 1999-2009, and can be tracked with modern brain scanning machines such as fMRI and PET... Indeed, thought is faster than light.
Other sites of interest: EasyPaintYourCar.com is a painting site dedicated to learning how to paint a car yourself, even if you've never painted a car before. You can refinish your car to professional standards at home, better than if you take it to someone else, and enjoy doing it at a fraction of the cost of having it done in an expensive shop. You can repair dents, rust, and use the most durable real automotive paint, and even learn to apply it without any special or expensive gear, in a safe and enjoyable manner. Paint your car in your garage, car port, or even driveway. You can spray, use an HVLP gun, or even use a roller.
Easy Make A Kindle and Your Own Publishing are sites about self-publishing and writing, and how any person can publish materials, print, online, and electronic books. You can drop out of the corporate slave labor rat race and own your own life by writing and distributing your own books on the subject that you know best.
InkJetHelper.com is a web site about escaping from the ridiculous cost of ink jet printer ink refilling- and refilling your printer for pennies instead of $70 a shot. It also has useful tips about maintaining ink jet printers, especially Canon brand printers.
Julia Lu Painting is all about the creative works of Chinese painter Julia Lu, a modern master of oil and water color painting. Julia shares her creative secrets, ideas, as well as her art work.
Off-site links Neil on Lulu Car On Lulu Tribe Blogger Wordpress Cookbook Space PaintWordpress Tripod 2 Google Wands Amazon B&N Kindle Facebook Linked GooglePlus Coast2Coast Viewzone YouTube 2 Blogtalk 1 2 3 4 5 6 7 8 9 1 2 3 4 5 6 7 8 9 1 2 3 4 5 6 7 8 9 1 2 3 4 5 6 7 8 9 a b c d e f a b c e f g h i 8 7 6 5 4 3 1 2 a b c d e f g h i a b c d e f g h i j k l m n o p q r s r u v w x y |