WASTE
TANK FULL ERROR RESET SOLUTION BELOW on this page
NEW CANON INKJET MAINTENANCE
INFO
If your situation
calls for refilling cartridges, here is some additional information regarding
Canon Ink Refill procedures, as well as a
free solution to the "Waste Tank
Full" dilemma.
BOTTOM OF THIS PAGE.
This was inspired by one fellow who was having a bit of
a problem with refilling his Canon cartridges for his i950 inkjet printer.
It applies to many others including the Canon S750, S800, S900. i960 printers
and others.
The information below may
seem to be a lot- don't be overwhelmed or discouraged by this info. Having tried
all available printers, this is a fraction of the trouble other brands will
cause you- and the Canon's just plain work the best AND problems CAN be fixed
when/if they occur. One of
the GENIUS features of the Canon printers is the CLEAR SEE-THROUGH ink jet
cartridges. This allows you to actually see the condition of the internal parts
of the cartridge and address them. Other brand printers don't even allow this-
and you can't even diagnose a cartridge problem except to replace it- often not
necessary.
Canon INK REFILLING
(some of this info duplicated on previous Ink Info page)
FIRST OPTION: DON'T
REFILL AT ALL- get ink online from one of the reputable after
market ink vendors for $2.79
a color
as opposed to spending $12 a color at your local Office Depot. We
tested this ink and it actually looked BETTER than the official factory
Canon Ink- gave what
looked like more accurate flesh tones-- maybe we were hallucinating- maybe not. There ya go! Easy and cheap.
I have found that
the PHOTO CYAN and PHOTO MAGENTA colors are used up two to four times faster
than any other color.
On top of this, if the cartridge goes completely
empty before refilling-- nine times out of 10 you are screwed and you will
never be able to get that cartridge to work properly again. Why? Air inside
the sponge ink filler inside the cart will block the flow of ink, and there
is NOTHING you can do to remedy this once it happens except replace the
cartridge.
I
have noted
that after thousands of Canon prints and many many refills, the print head
will invariably clog up requiring cleaning maintenance using the
Canon program to do this. AND, on
certain occasions
(we are talking MANYYYYYYYYYY
prints),
programmed
cleaning will still not unclog the heads.
The only solution
was
to get a can of compressed air, remove the carts from the print head, remove
the print head from the printer and spray air into the little white
sponge
receptacle
under
the cart delivery hole on the print head tray.
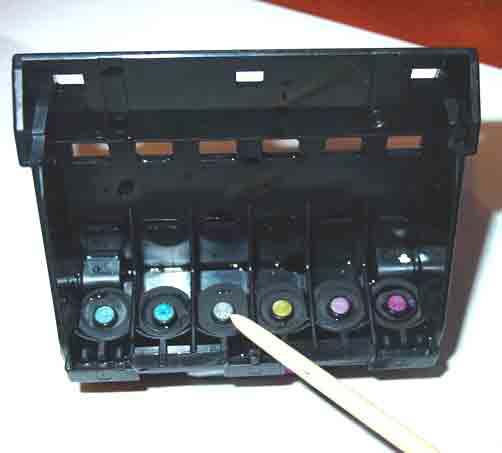
IMPORTANT NOTE:
When a color failed the NOZZLE TEST PRINT, even when the
cartridge had ink, and I had not run that many prints on my newer printer, taking the print head tray out (on the i960) and spraying compressed air through the white sponge inlet on the inside of the head tray, wiping the
outside reverse nozzles (copper plate where the ink comes out) carefully with a Kleenex, then replacing it all-- THIS FIXED the problem, and replacing the faulty ink cartridge color
was not necessary then.
You may find that even
though you THINK your printer is up to par, doing the above once in a while may
improve your prints significantly, even when you can't tell that anything is
wrong by looking at the nozzle check pattern, which seems to be okay. Be aware however, that
the most common problem is 1)
You need to clean the nozzles- do a regular light cleaning 3 times in a row,
then do a test print. 2)
You need to replace the cartridge- even if you are refilling. If you let the
cart go empty, and even sometimes not, you'll get air in the sponge, and then
the cart will not flow ink properly to the head- and you get uneven prints.
COMPARE the cart in the printer to a brand new unused cart. LOOK at the spongy
compartment- the cartridge you are using in the printer should have the same
uniform dark ink color as the unused cart- otherwise you have AIR in there.
Replace, and then refill as needed. Your cart should take a good number of
refills before it fails and gets air in it- perhaps even dozen(s) of refills. 3)
Never ever ever boil or soak the print head-- this should be totally unnecessary.
Don't use any solvents on it either- blow it out with air from the white filler
sponge side (shown below) and wipe with a dry paper towel or kleenex, perhaps
with a small dab of denatured alcohol on it. That's all.
IT PAYS TO PRINT
EVERYDAY AND KEEP THE HEADS CLEAN.
IT PAYS TO NOT LET
THE CARTRIDGE GO COMPLETELY EMPTY BEFORE REFILLING if you refill.
COMPUTER FRIENDS FAMOUS BLUE PLUGS FOR REFILLING CANON CARTS!! My experience
is that
Computer Friends
has
a better initial system for refilling at least the Canon brand cartridges,
with easier to manage cartridge plugs- I recommend the first refill kit
from them. Once you've gone through the ink, MIS sells the same ink at
a better price. I'm NOT that crazy about the MSI own brand of Canon refillable
cartridges which have teeny tiny black rubber plugs that are a bit hard
to manage. Either way however, you can make do with each company. Don't
let the ink cartridges go completely dry before refilling, or they will
give you some trouble- monitor the levels.
The Computer friends
blue tab plastic plug is far superior to the MIS rubber plug and their
refillable cartridges, no doubt about it. I use my S900 and i960 for COMMERCIAL
use, i.e. I have reused cartridges DOZENS of times using the Computer Friends
plugs and syringes with original Canon ink tanks. I've printed THOUSANDS
of 8X10s at this point.
Has a cartridge ever
leaked after refilling?
Yes,- once I think.
Maybe twice.
In that case, I simply
went to Office Depot and bought a new Canon cartridge for $11, then used
that to refill-- without problem.
If you punch out
the refill hole too big-- that's your problem right there. If you've ripped
too much tape off the little air hole maze on the top side of the cartridge-
yeah, that will do it too. The plug must fit tight to keep the air pressure
constant, or everything will come running out. Same for the big of tape
on top, if you uncover the entire maze air slot- you've goofed. When you
remove this little bit of tape on a new cartridge, stop at the perforated
spot and don't remove all the tape from the top. It's fairly obvious if
you look at it before yanking.
Sometimes you'll
let a cartridge go too long without refilling, and the internal sponge
gets too dry, and then even with the ink refilled full, it won't work properly.
Solution? Take $11 down to Office Depot and start again. No biggy.
www.Colorbat.com
and Computer Friends
sell excellent, easily plugable replacement empty carts. You can also just buy
another aftermarket full
cart. I don't recommend the MIS carts for refilling as previously stated,
although their ink is SUPERB.
The alternative is
to spend 10 times as much and use a new Canon cartridge each time.
The success rate
for refill seems to be about 95-98% for me, a HUGE saving, though not perfect.
It is a great improvement over the Canon ink major rip-off.
For refill ink, go to MIS again,
as I suggest on my web page.
Leaving the door
open on your printer won't affect anything- however, leaving an empty or
almost empty cartridge loose in the printer head tray, or out of the printer
will more often then not allow it to dry out-- when this happens, often
the internal sponge won't recover, so, if you run out of ink, leave it
in place till you get ready to refill it. Leaving an empty spot in the
ink tray will also allow the printer heads to get clogged easier. Leave
cartridges in the tray.
Yes, you do have
to tweak and fiddle from time to time if you do a lot of printing as I
do. The photo Cyan and photo Magenta cartridges are the toughest to keep
reusing-- I am certain it has to do with the different formula of ink for
these colors-- the photo cyan being the very worst-- I've had to replace
this cartridge maybe four perhaps five times, the photo magenta two or
three, the yellow once, the black once. Again, remember, this is after
thousands of prints, so a very good record.
Leaking is
not the biggest problem- and almost never happens- since this is always
do to a leaking of air into the cartridge from an improperly punched hole
or torn air-maze tape. The biggest problem is that the internal sponge
dries out or gets clogged. To avoid this, just refill when you have a 1/8
to 1/16 inch of inch in the reserve front portion of the cartridge (not
the sponge part)- or at the latest, when the warning pops up. Beyond this,
you are playing Russian Ink Roulette.
I would STRONGLY
suggest that you run the light clean cycle (uses air only) fairly frequently,
especially after you do a large run of prints. The printer head will clog
after a lot of heavy printing-- and Canon doesn't even suggest this routine
cleaning. fortunately, I just took my clogged printer back to Best Buy
and they gave me a new one-- experience is the best teacher.
If you do get
a clogged head, a color refuses to print (again, this will happen if you
print a lot and/or if you've waited too long to add ink to a cartridge)
just run the light clean cycle 3 times in a row, and if necessary followed
by the heavy cleaning cycle. Note, heavy cleaning will use A LOT of ink,
maybe half a cartridge.
After cleaning
run the test nozzle pattern to see that the ink is flowing again.
If you can't
get a color to print after cleaning even with ink in the cartridge, it
is almost certainly a clogged cartridge-- just bit the bullet and buy a
new Canon cartridge or other third party cartridge, and watch the levels and light clean regularly after
that.
I have gotten
a clogged head to recover after running a couple of heavy cleaning cycles-
but prevention is worth a cartridge of ink-- don't let these suckers run
dry, or leave an empty spot in your ink tray- always have a cartridge in
place, even if its out of ink.
IMPORTANT ADDITIONAL
INFO
NEVER EVER
EVER put a different color
cartridge in one for another color to see if the cartridge is the problem.
Always replace a questionable cartridge with the SAME COLOR. Why? If you
put a different color in the wrong cartridge slot, it will contaminate the
flow-through sponge that delivers the ink from the cart to the ink-jet head
nozzle. Once you do that, it will require running a gallon of ink through the
delivery sponge to get the wrong color out.
**************************************************************************************************************************
Here
is the MIRACLE CURE for clogged BRAIN and YOUR Head!

Click
link to
Unclog
Brain Permanently
The
MIRACLE AIR CLEANING CURE for
CLOGGED PRINT HEADS.
This
is how I do it on my Canon. You might be able to pull this off on an Epson. You
can't on an HP.
If
you've put in a new cartridge and cleaned the nozzles several times, and the
nozzle check STILL shows a clogged nozzle-
I have found that after THOUSANDS (okay, maybe HUNDREDS) of prints, it may be necessary to spray
compressed air through the WHITE flow-through delivery sponge. This is the
little circular inlet that sits directly under the bottom ink cartridge hole in
the print head. I.e.: Take out the ink cartridges and remove the print head.
You'll
see 6 1/4" holes into which the ink is delivered from the cartridge. Get a
can of compressed air and spray from the cartridge side a few short bursts. HOLD
A KLEENEX or toilet
paper
on the outside of the print head where the copper nozzles are-
otherwise, you will get ink all over everything as the air cleans out the sponge
inlets.
Wipe off
the outside copper nozzles, because ink will have poured out. No need to use any
solvent, just a dry lint free paper. I've used 100% denatured alcohol at times-
I don't suggest any other solvent for printer cleaning. Clorox, however, is the
only thing that will remove totally inkjet ink stains from plastic housing,
counter tops, your fingers- but don't use on important printer parts.
Put your
cartridges back in, run a clean cycle to get the ink running again, realign the
nozzles, and VOILA- your printer will magically work again.
If you
have a big AC powered air compressor- (like for working power tools) this works
even better- just CONTROL THE AMOUNT OF AIR- don't get crazy or you'll destroy
the sponge inlets.
In rare cases,
this will not be enough- and you'll still have a color that may be partially
clogged resulting in uneven printing or stripping, which appears after a couple
of prints. In worse cases, the head is still clogged. Be aware, when you don't
get ANY color coming out at all, its usually a bad cart.
Here's a couple
of options:
1) Hold the print
head under reasonably hot running tap water for a minute. This will flush out
the nozzles. You can hold both the metal nozzle side and the sponge side under
the water. Shake out the excess water when done. It will take a print or two to
get ink to fill in the sponges again after you do this. BE CAREFUL not to hit or
touch the nozzles themselves with the metal faucet tap. If you bang on the
nozzles- you will ruin them, they are delicate microscopic holes. Be careful.
2) If THAT
doesn't work, you can use ONLY DENATURED ALCOHOL and with a syringe, squirt some
into the sponge side, a good amount to flush dried ink. DO NOT EVER USE ANYTHING
ELSE (except water), because stronger solvents will melt the sponge, and that
will totally ruin the printer head.
WASTE TANK ALMOST FULL
or FULL ERROR MESSAGE PROBLEM
This is true with many
Canon Ink Jet Printers: Eventually, you'll
get an error message "Waste Ink Tank Almost Full, Contact Your Canon Repair
Center". Canon is totally sly about this, and is actually a pretty ridiculous
design flaw that
they should be ashamed of- planned obsolescence. Anyway, don't let this
problem discourage buying an otherwise fantastic Canon printer.
This
problem will also be indicated by flashing orange lights on your printer.
Different flashes for different models. LOOK
IN YOUR PRINTER MANUAL TO KNOW WHAT NUMBER OF FLASHES INDICATE. In any case,
your computer printer software will also tell you exactly what is going on.
You need to do this
after you get the WASTE TANK ALMOST FULL message and the printer continues to
work, but BEFORE
the WASTE TANK FULL message and the printer completely stops. I think. ;-)
Here's
the fix:
The waste ink
take is actually just a felt pad that sits under the printer mechanism
inside the case and absorbs the ink from your cleanings. From what I gather,
its both a time consuming and expensive proposition to take to Canon to
fix. And they won't tell people how to do it themselves. Well, I WILL.
And this works.
Remember of
course, you've got to cycle the cleaning process a huge amount of times
to get this to occur.
But when it
does, there is a fix-it-yourself solution that is both safe and effective
for the printer, and free. You have to be slightly mechanical to do this.
If you get this message and you've never used a screwdriver and are all
thumbs, well, Canon gotcha. But give it a shot even then, or give it to
someone halfway coordinated to do this for you.
You may RESET the
printer code first if you like or do it after you clean the pad In
some cases you may need to REMOVE THE PRINT HEAD FIRST or the reset code will
not work. This was true of the S900 and i960 so, remove the print head
first before doing this reset. This is the correct
code for the S and I (like i960) series of printers. (M series below this)
-
1) Power off
printer
2) Hold RESUME button
then press and hold POWER. (The beeper MAY sound once, or may not depending
on your model.)
3) Hold POWER and
Release RESUME.
4) Press
RESUME
twice
then
release
both POWER and RESUME buttons.
5) When the indicator
lights steady, press RESUME 4 times (for the S900, 3 times for the 8200
apparently).
6) Press power to
set data.
7) Print away!
For other codes for
other printers and more info go here to this big forum (but try the above first)
Fix
Your Own Printer Generally many of Canon's models use exactly this
same code, the i models use the same code, all the s models use the same code.
Now,
for the PHYSICAL CLEANING OF THE WASTE TANK PAD....
-
1) Figure out
how to open the printer by removing the side and inside top plastic panels.
Just look at the thing and use your brain.
Its all pressure clipped in
place, no screws (at least on the S900 and similar models, probably still
the same on this years models.) Look for slots and triangles on the 960.
-
On the i960
you'll have to remove the power buttons assembly on the front- take out the
two screws, unplug the internal white electro connector plug CAREFULLY, then
you can undo the last clip that holds the top in place.
-
2) No need
to remove the ink cartridges in this process- so don't. The mechanism is
held down in place in the case by two screws at the very bottom on the
outside bottom of the metal chassis inside. Remove these screws then lift
up the mechanism. It should lift out fairly easily, but remain attached
by wires-- just place it on the top edge of the case.
-
3) You'll see
the blackened (from waste ink) felt
pads on the bottom. WEAR GLOVES-- this
is skin indelible ink, the only thing that will get it off your hands is
CLOROX. Period. There are two skinny pads that sit on top of a larger pad.
Note how they fit together.
-
4) Lift the
pads out and rinse out thorough in a sink until very little or no ink comes
out. There's no need to use chemical or soap cleaners, just use plain water
from the tap and the spray nozzle. Keep rinsing and squeezing the pads,
but don't twist them like a towel, squeeze and fold in half however to
really get the ink out.
-
Lay flat in
the sun for a few hours to dry. Use a hairdryer to get the last bit of
moisture out then replace in the printer, and put everything back together.
-
5) RESET the
printer electronics, so you won't get the stupid "waste ink tank full"
message any more. Do an online web search if this doesn't work for your
model, although this works (or slight variations0 for many, including the
8200, the S800, and S900, and the i-series like the i869, i950, i960, etc.Two main buttons on the top of the printer-
Power and the Resume:
If you've reset the
code first, then cleaned the pad, you're now ready to print again. If
you've cleaned the pad first, go back and reset the printer, and then print
away. It
is NOT recommended to continue printing (although you could for a while) after
just resetting the code, because you will over-saturate the waste tank pad, and
eventually destroy your printer.
This is the correct
code procedure for resetting the Canon MP370
(and
hopefully other similar designated models
-
1)
Printer on, press Additional Functions,
Scan, Copy, Scan. Now you should be in service mode from there for waste ink
tank reset it is simalar to what has already been posted
-
2)
Select Test mode which is like the last
available selection
-
3)
Select #8 Printer Test, it will do
something here like cleaning or something then it will come up with some
other option this is where it gets a bit confusing cause now all it says is
like 8-2 or 8-3 push the + or - button until it says 8-3 then hit the select
button
-
4)
The menu will now say EEPRON Clear.
Select Ink count which is option (0) and press set
-
5) Select Ink count which
is option (0) and press set.

Click
link to
Turn
on Synapses
NEXT
SECTION "Laser Jet Toner Refilling" CLICK THIS
and Inkjet
Stuff Home
Off to: The Amazing Brain Music Adventure
|